
How to Make Free Coloring Page from Photo (Best Practice Guide)
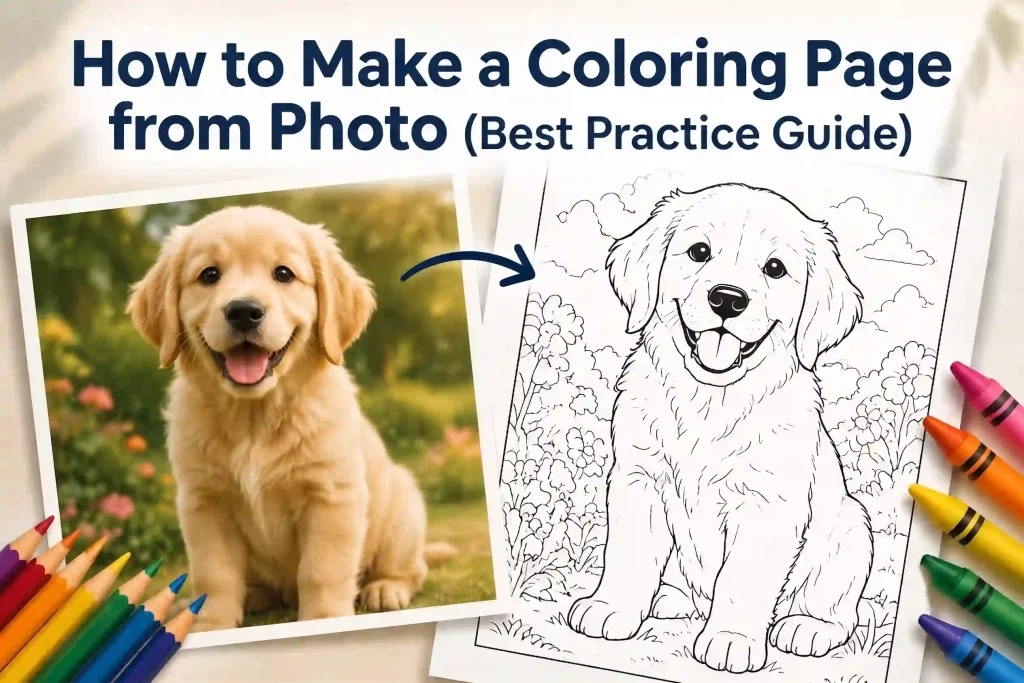
You type “photo to coloring page” into Google, upload a photo, click generate, and… the result looks nothing like what you imagined. Lines are too dense. The outline didn’t close. Print it out and it’s a blurry mess.
Here’s the thing: turning a photo into a coloring page isn’t just about pressing a button. It’s about picking the right settings for what you actually want to do with it.
In this guide, I’ll walk you through everything that determines whether your coloring page turns out great—or goes straight to the recycling bin. No fluff, just what actually matters.
What Makes a Good Coloring Page?
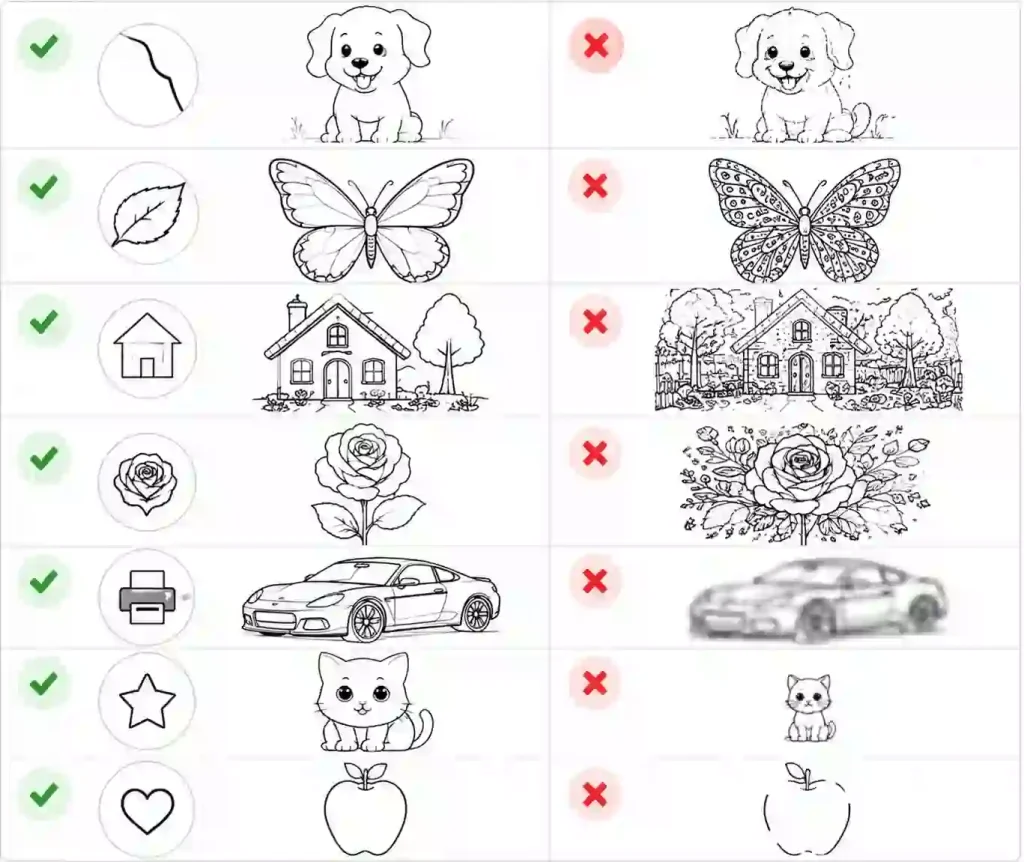
| Feature | ✅ Good Coloring Page | ❌ Poor Coloring Page |
|---|---|---|
| Clear Outline | Lines are clean, continuous, and easy to follow when coloring. | Broken or unclear outlines make colors spill outside areas. |
| Enough White Space | Large empty areas give people room to color comfortably. | Too many tiny details leave almost no space to fill. |
| Simple Structure | Main subjects are easy to recognize at a glance. | Too much texture and background noise make the page confusing. |
| Balanced Details | Keeps important features while removing unnecessary complexity. | Every small detail is converted into lines, creating visual clutter. |
| Print-Friendly Quality | High resolution with sharp edges that stay clear on paper. | Low-resolution images look blurry after printing. |
| Strong Subject Focus | The main object or person takes up enough space on the page. | Small subjects become difficult to recognize or color. |
| Closed Shapes | Enclosed areas make coloring easier and more enjoyable. | Open or disconnected lines make coloring messy. |
⚡️Quick Start: Turn a Photo into a Coloring Page in 30 Seconds
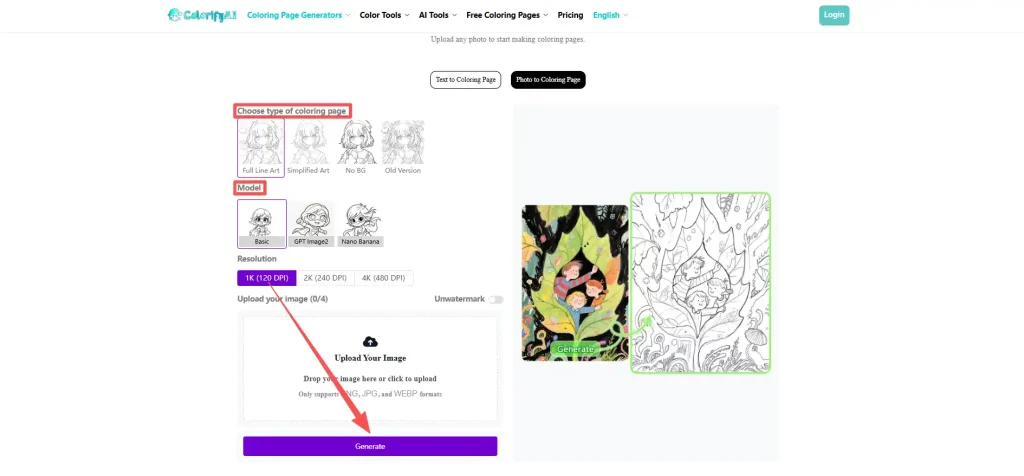
If you just want to turn a photo into a coloring page with zero hassle:
- Go to the photo to coloring page tool on Colorify AI.
- Pick Simplified Art (if you’re unsure—this works for most cases).
- Upload your photo.
- Click Generate, then Download as PDF.
That’s it. No signup, no payment.
But if you want results that actually look good when printed and colored—keep reading. The rest of this guide covers the decisions that separate a great coloring page from a wasted sheet of paper.
🌄4 Coloring Page Styles: Which One Actually Works for You?
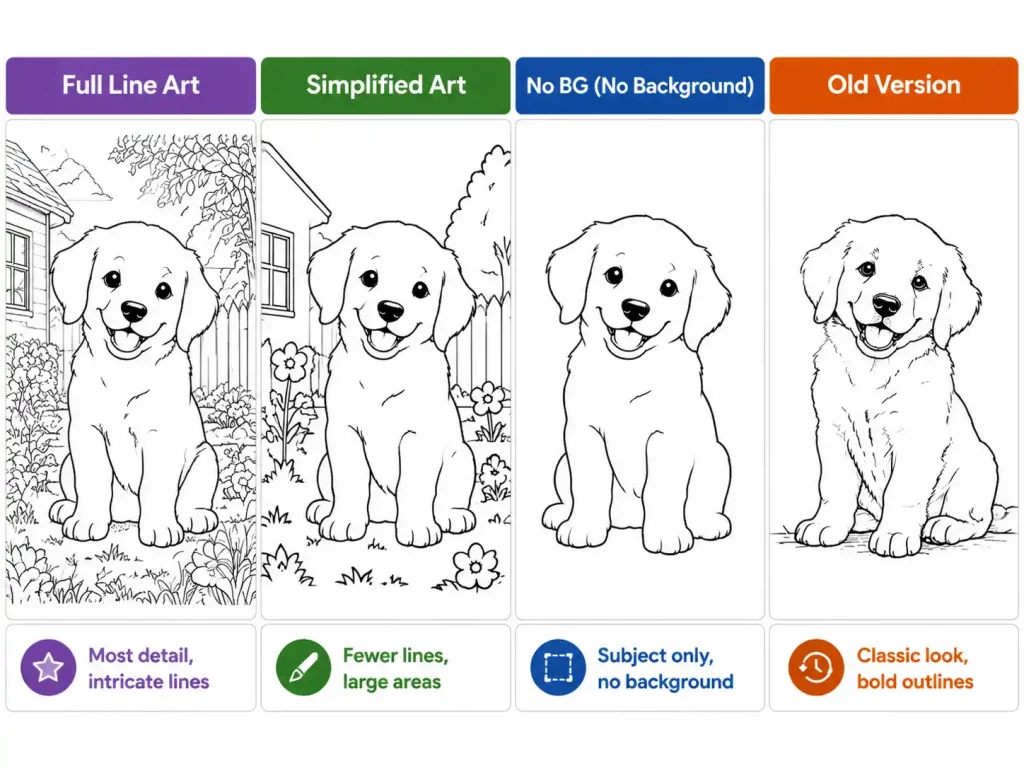
Colorify AI gives you four distinct styles for turning a photo into a coloring page. Each one serves a totally different purpose. Picking the wrong style is the #1 reason people get disappointing results.
Here’s what each style actually does—with real recommendations.
Full Line Art
What it does: Preserves the most detail. Every edge, every texture, every contour gets turned into a line. The result is dense, intricate, and rich.
Best for:
- Adult coloring—you actually want detail to work through
- Photos with a single clear subject (a portrait, a flower, a car)
- Making something frame-worthy after coloring
Skip it if: you’re making pages for kids, or your photo already has a busy background. The result will feel overwhelming and leave almost no white space to color.
Simplified Art
What it does: Strips away finer details and leaves only the essential outlines. Fewer lines, bigger colorable areas, cleaner overall look.
Best for:
- Kids’ coloring pages—large open spaces are easier to fill with crayons
- Photos with moderate complexity (a person plus background, a pet on the couch)
- First-timers who just want something that “works”
Skip it if: you want a highly detailed, intricate coloring experience. Simplified Art intentionally loses some detail.
No BG (No Background)
What it does: Detects the main subject in your photo and removes the background entirely. Only the subject’s outline remains.
Best for:
- Making coloring stickers or cut-outs
- Portrait-only coloring pages (just a person, no surrounding noise)
- Adding the subject to another project (collage, greeting card, worksheet)
Skip it if: the background is part of what you want to color—like a landscape or a scene-setting photo.
Old Version
What it does: A classic, slightly rougher rendering style with bolder outlines and a hand-drawn feel.
Best for:
- A different, more “vintage” aesthetic
- Quick tests when you don’t need the latest model’s precision
- Projects where you want the coloring page itself to have character
If you can only try one: Start with Simplified Art. It’s the safest default for most use cases. You can always regenerate with Full Line Art if you want more detail.
AI Model & Resolution: The Settings Most People Skip
After picking a style on Colorify AI, you’ll see two more options: the AI model and the resolution. Most people leave these on default—and sometimes that’s fine. But knowing when to change them makes a real difference.
Choose the Right AI Model
| Model | What to Expect | When to Use |
|---|---|---|
| Basic | Fast processing, solid results | Everyday photos with clear subjects. The default that works for 80% of cases. |
| GPT Image2 | Higher detail, better edge detection | Complex photos (group shots, detailed scenery, anything with lots of overlapping elements). Handles tricky contrast better than Basic. |
| Nano Banana | Unique artistic rendering | When you want the coloring page to have its own visual style rather than a purely faithful outline. Worth experimenting with. |
Rule of thumb: If your first result looks “off”—lines missing, contours not connecting—switch from Basic to GPT Image2 and try again.
Pick the Right Resolution
| Resolution | DPI | Screen | Home Print | Professional Print |
|---|---|---|---|---|
| 1K | 120 | ✅ Fine | ❌ Can look blurry | ❌ Not enough |
| 2K | 240 | ✅ Fine | ✅ Good enough | ⚠️ Borderline |
| 4K | 480 | ✅ Overkill | ✅ Crisp | ✅ Best |
Honest recommendation:
● If you’re just testing or previewing on screen → 1K is fine
● If you’re printing at home for yourself or your kids → pick 2K, it’s the sweet spot
● If you’re selling coloring pages or printing in large format → go 4K
5 Common Problems When Turning Photos into Coloring Pages (and How to Fix Them)
Most guides tell you to “use good photos” and leave it at that. But what does “good” actually mean in practice? Below are the five most common problems people run into when they turn a photo into a coloring page—along with the specific fixes that solve them.
❌️Problem 1: Too Many Lines, Nowhere to Color
What it looks like: The coloring page is a dense web of black lines. There’s barely any white space. A kid looks at it and gives up.
Why it happens: You picked Full Line Art on a photo that’s already detailed—think a group photo, a busy street scene, or a pet with intricate fur.
Fix:
Switch to Simplified Art. This is the single most effective fix.
If that’s still too busy, crop the photo so the subject fills more of the frame before uploading.
❌️Problem 2: Outlines Don't Close—Color Will Spill Out
What it looks like: The lines are broken in places. When you (or a kid) try to color, the crayon bleeds across boundaries that should be walls.
Why it happens: The original photo has low contrast, soft edges, or backlighting. The AI can’t find a clear edge, so it draws a weak one.
Fix:
● Use a photo with better lighting—front-lit, clear subject against background.
● Switch the AI model to GPT Image 2, which handles edge detection better on tricky photos.
● Still broken? Upload a different photo. The tool is good, but garbage in, garbage out.
❌️Problem 3: Busy Background Ruining the Main Subject
What it looks like: The person or object you wanted is fine, but the background turned into a mess of random lines. Trees, furniture, random people—all competing for attention.
Why it happens: You uploaded a photo with a cluttered background, and the AI faithfully converted all of it.
Fix:
- Switch to No BG style. This strips the background and leaves only the main subject.
- If you want some background but less chaos, crop the photo tighter around your subject before uploading.
❌️Problem 4: Prints Look Blurry Even Though It Looked Fine on Screen
What it looks like: On your monitor, the coloring page looks crisp. You print it, and the lines are soft and fuzzy. Not usable for coloring.
Why it happens: You downloaded at 1K resolution and/or saved as PNG. The screen hides the lack of detail; the printer exposes it.
Fix:
- Set resolution to at least 2K before generating. This is the single biggest factor when you turn a photo into a coloring page for print.
- Download as PDF, not PNG. PDF preserves vector-like line sharpness better for print.
- Use decent paper. Standard 80gsm printer paper is fine; anything thinner will bleed.
❌️Problem 5: The Subject Is Tiny—a Thumb-Sized Person on an A4 Page
What it looks like: The photo was a full-body shot, a distant landscape, or a group picture. The coloring page faithfully reproduces everything—including the fact that each person is the size of a coin.
Why it happens: The AI doesn’t know what you wanted to focus on. It converts the whole frame as-is.
Fix:
- Crop before uploading. Your subject should fill at least 60% of the frame.
- Close-up portraits work infinitely better than full-body photos.
- One subject > multiple subjects. A single dog will look great; a pack of five dogs in a wide shot will not.
From Kids' Activities to Gifts: 6 Creative Ways to Use Photo Coloring Pages
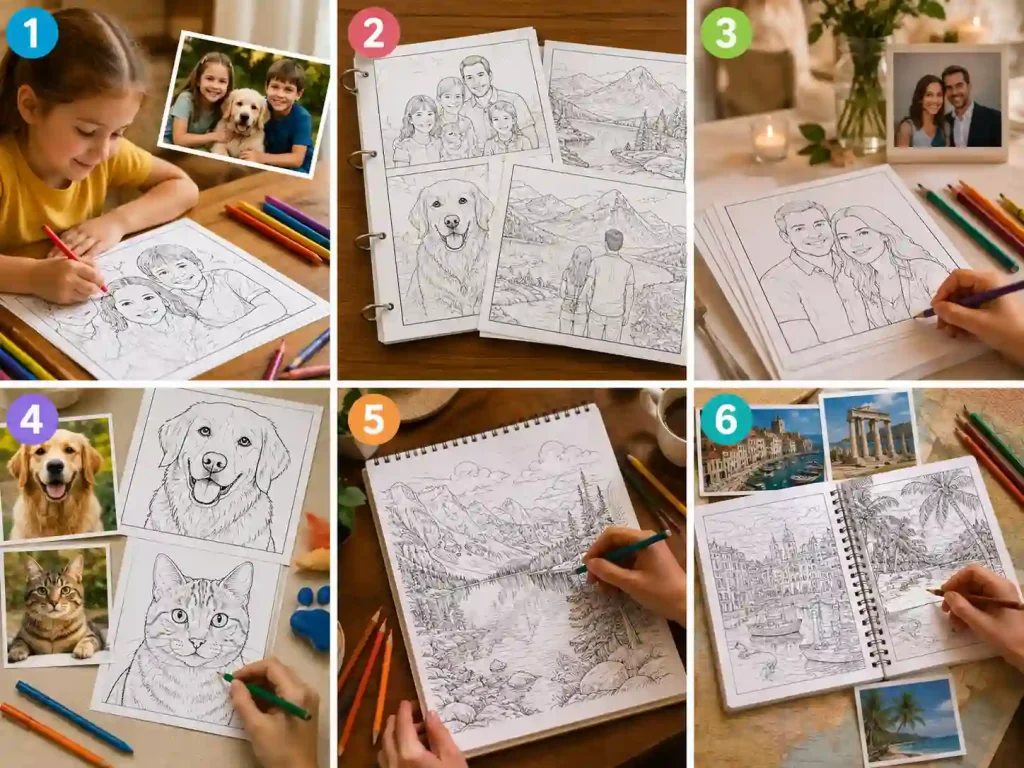
Once you’ve turned an image to a coloring page with clean, printable results, here’s what people actually do with them:
- Kids’ coloring time. Turn family photos into Simplified Art pages. Kids love coloring pictures of themselves, their pets, or their grandparents.
- A custom coloring book gift. Convert 10–15 meaningful photos (family, trips, pet), download each as PDF, print, and bind with staples or binder rings. Costs almost nothing, means everything.
- Wedding or party activity. Print a stack of coloring pages featuring the couple or the birthday kid. Set out crayons on a table. Kids stay entertained, adults join in too.
- Pet coloring pages. Dog and cat photos convert exceptionally well—clear facial structure, distinct ears and eyes. The results are surprisingly good.
- Adult stress relief. Convert a travel photo or a landscape shot using Full Line Art + 4K. The detail level is genuinely satisfying to work through with colored pencils.
- Travel coloring journal. Batch-convert photos from a trip and print them as a coloring logbook. Color as you relive the memories.
Conclusion
Getting a clean, printable result from a photo to coloring page tool comes down to three decisions:
- Pick the right style. Simplified Art for kids, Full Line Art for adults, No BG for isolated subjects.
- Choose a high enough resolution. 2K is the minimum for printing; 4K for anything you’d sell or frame.
- Upload the right kind of photo. Clear subject, good lighting, and tight framing will fix most problems before they happen.
Once you know these three things, you can turn any photo into a coloring page on Colorify AI without the trial and error. Whether you need a single page for an afternoon activity or want to batch-convert images into a full coloring book, the process is the same—pick your style, set your resolution, and print.
Ready to turn your photos into coloring pages?